The Ultimate Free Guide to Passing Your CDL Pre-Trip Inspection Every Time
For most aspiring truck drivers, the Pre-Trip Inspection is the most nerve-wracking portion of the CDL exam. It isn't just about knowing how the truck works; it is a performance. You have to demonstrate to an examiner that you can identify every critical safety component and articulate exactly why it is safe to operate.
Statistically, more students fail the CDL exam during the pre-trip inspection than during the backing maneuvers or the road test. Why? Because it requires a combination of rote memorization, technical understanding, and nerves of steel. This guide will break down the inspection into manageable sections, helping you build a mental checklist that ensures you never miss a beat.
Jump to Section
Why the Pre-Trip Inspection is Critical
The DOT (Department of Transportation) mandates pre-trip inspections for one reason: safety. A 40-ton vehicle traveling at 65 mph is a massive responsibility. A loose lug nut, a frayed brake line, or a leaking wheel seal can lead to catastrophic accidents.
When you sit for your CDL exam, the examiner isn't just checking if you know where the oil dipstick is. They are evaluating your professionalism and attention to detail. If you can't be trusted to find a major leak while parked, they won't trust you to manage the vehicle on the highway.
Understanding the Pre-Trip Inspection Format
The inspection is generally broken down into three possible sections, though you should be prepared to do all of them. These include:
- Section A: The Front of the vehicle and the Engine Compartment.
- Section B: The side of the cab, the fuel tanks, and the rear of the tractor.
- Section C: The trailer and the coupling system.
- The In-Cab & Air Brake Test: This is a mandatory component for everyone, regardless of which other section you are assigned.
A key tip for passing is using the "Magic Script." For almost every non-rubber part, you should say: "Properly mounted and secured, not cracked, bent, or broken." For rubber parts (hoses, belts, tires), you say: "No ABCs: No Abrasions, Bulges, or Cuts."
The Engine Compartment: What to Check
When you pop the hood, start on one side and work your way across. Most drivers start on the passenger side to check the coolant, water pump, and alternator, then move to the driver's side for the steering and braking systems.
You must identify the Air Compressor and the Power Steering Pump. You need to tell the examiner if they are gear-driven or belt-driven. If you get this wrong, it's a point against you. You also need to check all fluids (oil, coolant, power steering) and ensure no hoses are leaking or showing signs of wear.
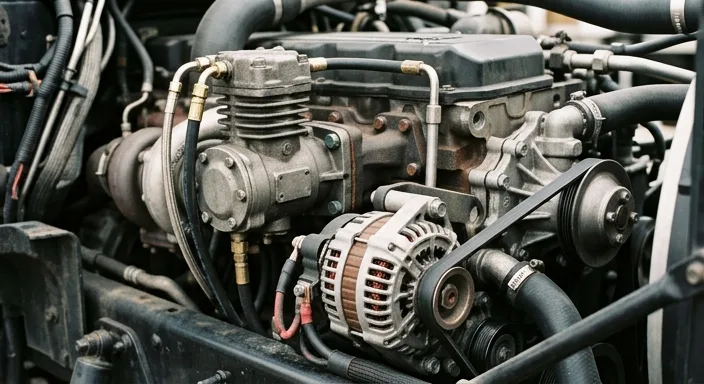
Don't forget the steering linkage. Check the steering column, the gear box, the pitman arm, and the drag link. Every castle nut must have a cotter pin. If it's missing, the truck is technically out of service.
The In-Cab Inspection and Air Brake Test
This is where most students fail. The Air Brake Test is an automatic failure if you miss a single step or misstate a number. You must perform these steps in order:
- The Safe Start: Ensure the truck is in neutral and the brakes are set before turning the key.
- Applied Leakage Test: With the engine off and the wheels chocked, press and hold the brake pedal. You should lose no more than 4 PSI in one minute (for a Class A combination).
- Low Air Warning: Fan the brakes until the warning light and buzzer come on (usually around 60 PSI).
- Spring Brake Pop-out: Continue fanning the brakes until the tractor and trailer protection valves pop out (usually between 20-45 PSI).
During the in-cab portion, you also need to check your "city" and "highway" horns, your windshield wipers, your heater/defroster, and your three pieces of emergency equipment: spare fuses, three reflective triangles, and a fire extinguisher that is properly charged and secured.
External Inspection: Lights, Tires, and Coupling
The external inspection focuses on the "Three L's": Lights, Leaks, and Leans. Check that the truck isn't leaning to one side (which could indicate a suspension or tire issue). Ensure there are no puddles under the engine.
For tires, remember the tread depth requirements: 4/32 inch for steer tires and 2/32 inch for all other tires. You cannot use retreads on the steer axles. Check the rims for "illegal welds"—this is a favorite question for examiners.
The Coupling System is equally vital. You must check the fifth wheel apron, the kingpin, and the locking jaws. Ensure there is no gap between the apron and the fifth wheel. If there is a gap, the trailer could disconnect while you are driving.
Top Tips to Avoid Automatic Failure
- Don't Rush: If you realize you forgot something, tell the examiner. As long as you haven't moved to the next section, you can usually go back and correct yourself.
- Use Your Hands: Physically touch or point directly at the parts you are describing. It shows the examiner exactly what you are looking at.
- The "Not Leaking" Rule: For anything that holds fluid or air (hoses, tanks, shocks, water pump), always conclude with "and it is not leaking."
- Chock Your Wheels: Before starting the air brake test, you must ensure the wheels are chocked so the truck doesn't roll when you release the parking brakes.
Frequently Asked Questions
Q: Can I use a checklist during the exam?
A: Usually, no. Most states require you to perform the inspection from memory. However, you are allowed to follow a logical path around the truck to help trigger your memory.
Q: What if I don't know the name of a part?
A: Try to describe its function. If you can explain what it does and that it is "properly mounted and secured," you might still get the point, but it's always better to know the technical name.
Q: How many points can I lose?
A: Every state is slightly different, but generally, you can miss a few minor items. However, any safety-critical item or the air brake test will result in an immediate failure.